
How I categorized my photo essay into the specific documentary mode Observational, the idea was to keep the subject free-flowing, letting the characters mentally and physically natural looking. This being not a staged environment and nothing being arranged at any time, the pictures were shot in a fly-on-the-wall perspective allowing the audience/viewers to come to a conclusion on the subjects. As for the documentary work for the trailer, even though we're going for a reflexive approach the images were taken in an observatory mode, keeping everything as normal and letting the workers doing their day-to-day routine also during the sound recorded interview, we captured images observing the interview securing the expressions from the subject.
The Qualities of the image with advanced visual language shows the inner qualities of the image, I especially set my mind on capturing the difficulties and the deterioration of the manual labour business and how in a photojournalism sense how the image can convey meaning to the audience with specific attributes such as emotional content; In relation to my photo essay and documentary work, the images portray the sense of hard work, up hill battle and backbreaking work which the audience can relate to them or their family members going through the same business path. Also for the images shot on our documentary trailer, we certainly captured the physical side showing the work in progress leading up to them travelling around, this has a similar link towards my photo essay. Another attribute is relative context which is the iconography of the image and how the audience can relate by deconstructing the photo by understanding; especially for our documentary work, the photos taken included in the trailer accurately show the idea capturing the business name 'Carters Steam Fair' also the assistant owner 'Joby Carter' in multiple images idolising the subject. As for the personal photo essay linking them with relative context, I prioritized the torn & wear on objects including bags, equipment and tools to show the 'punishment' where it's a recurring theme throughout importantly on the subjects face and hands boosting the strain & concerned expressions on the audience. The next attribute covering empathy and creating quizzical thoughts & emotions; I wouldn't say my photo essay is reinforcing a moment in history but certainly creates relationship with the audience, maybe not personally to them but others in their life and finally being shown the struggle and physical tole on the body. It offers a more wider range of emotions than their experiences personally but giving them a sense of appreciating others around them going through manual labour. Another attribute involving shock and expectation determining the strongest visual meaning for the audience creating the biggest reactions, my photo essay strongest visual language is the effect on manual labour and how it influence the audience to feel sorry for them but as i was saying earlier the effect on their personal life knowing someone apart of it. There were particular photos for our documentary trailer focussing on the disintegrating of the business, there were old steam fair statues rotting away also wheelbarrows and general equipment revering back to the dying breed of a steam fair which we want the audience to feel miserable about the workers and families losing how they make an income. The next attribute follows 'The Voyer Image' technique and how photographs record events being secretive by investigating the image further also capturing the events in a everyday lifestyle but with my photo essay following around a manual labour worker showing his day-to-day lifestyle, travelling to projects then spending all day working using dangerous tools, it pay diffidence to their body but they said 'it's all what I know'. Finally the last attribute involving 'The Surreal photo-essay document', the documentary work followed this attribute intensely especially when the attribute captures individuals and events that the general audience haven't had contact with. The carters steam fair is something a rare amount of people haven't had contact with especially beyond the rides and stools which gives us the safety of the images we captured. The secretive life behind closed doors for these travelers has been in a general sense unseen also with these small facts previously about them draws in wider audiences that's why we captured the events happening beyond the rides in relation to keep the audience guessing and surprised.
For both the photo essay and the documentary work, using the hyper and meta aesthetics of the photojournalism image influenced me by creating exaggerating emotions, breaking edges, foreground vs background, depth of reality fields, shuttering reality and finally above and below shots. The majority of these photojournalism techniques were followed for my photo essay, especially shuttering reality and depth of field shots as i wanted specific parts in the frame to be noticeable pursuing the negative approach to manual labour. Exaggerating the image which I used in my photo essay really captured the hardship of their lives by showing the facial expressions and hands so the audience can compare it to their lives and the emotional imagery conveyed which creates an emotional response from the viewer. I staged the photo of the worker posing into the camera to create a sudden relationship with the audience plus thinking about the location beyond the subject creating more of an atmosphere. Another technique I used was keeping the image moving and natural by breaking the edge, allowing parts of the body not to be seen giving the audience a chance to imagine the parts missing outside the frame. Depth of fields were a key part of my photo essay more than the documentary work where their priority is to separate the subject from the event, this makes the audience define their interpretation on the event happening around the subject plus the use of shuttering reality captures the moving image, freezing the event especially with the hand and tool movements of the workers in the photo essay.
After shooting the documentary, the photos had to be shot in RAW, shooting in Raw means professional editing image techniques on photoshop CS3 to CS6 and towards editing for film sequences. Photoshop has it's own RAW editing facility, being able to process photos without the basic standard editing in the filters, the advantage of this is that it allows you to edit the photos in the condition they were captured in. A nice little recap before you edit the images, you can save the photo as an .XMP so you don't lose the image completely after editing plus you can go straight back to default. RAW processing technique influenced the way I show my images in my photo essay, I mainly concentrated on recognising the weather temperature surrounding the subject in the picture. I also focussed on raising the colours making them clear through the temperature but to create emphasis on the scars of their hands and faces but adding effects but lowering the clarify, vibrance and saturation to add to the theme I was going for. As for the photos captured on our documentary work, we focussed on the colours, aiming and exceeding their art in painting by using the colours to their advantage.
By Joe Taphouse.
At the beginning of this
semester we learnt how to use the Cannon 550DSLR’s which we have then been set
the task of using to create all of our work during the semester. I have learnt
many techniques such as RAW Processing and editing and well as developed my
knowledge of Depth of Field, shutter speed, ISO and many others.
The genre of documentary
photojournalism that I would categorize my Photo Essay in would be
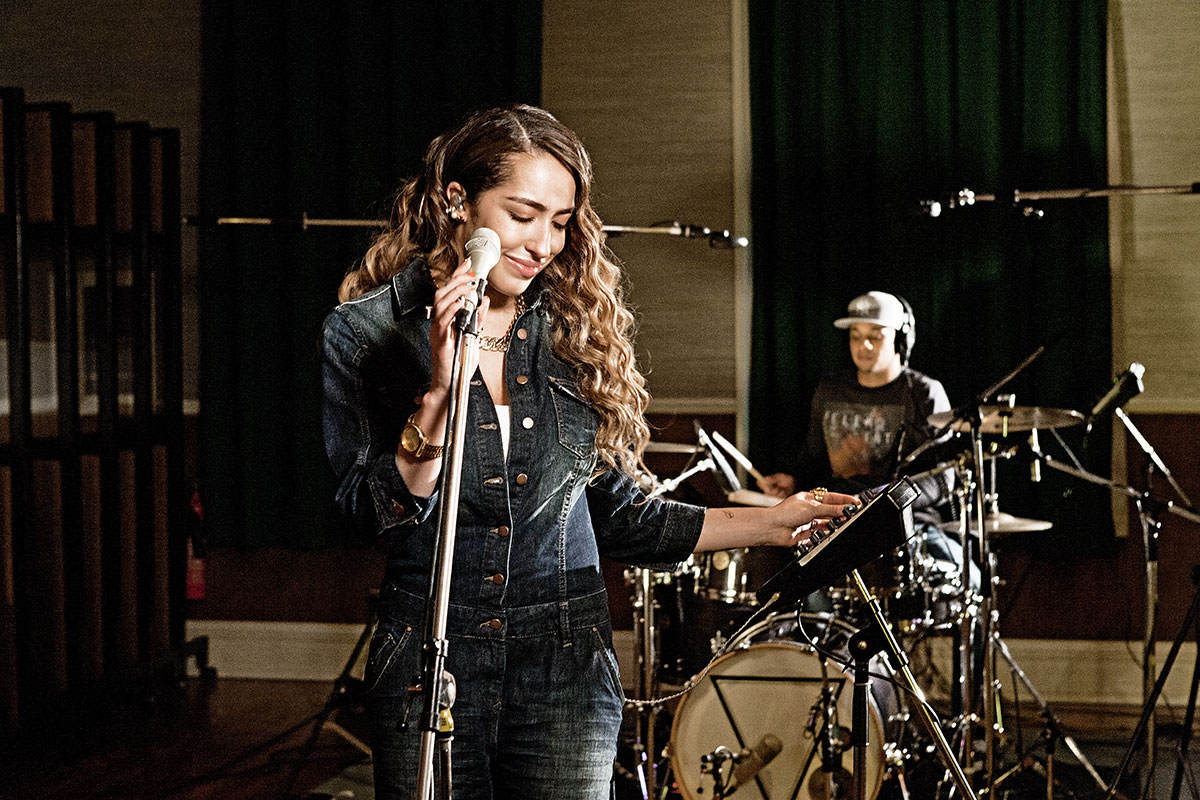
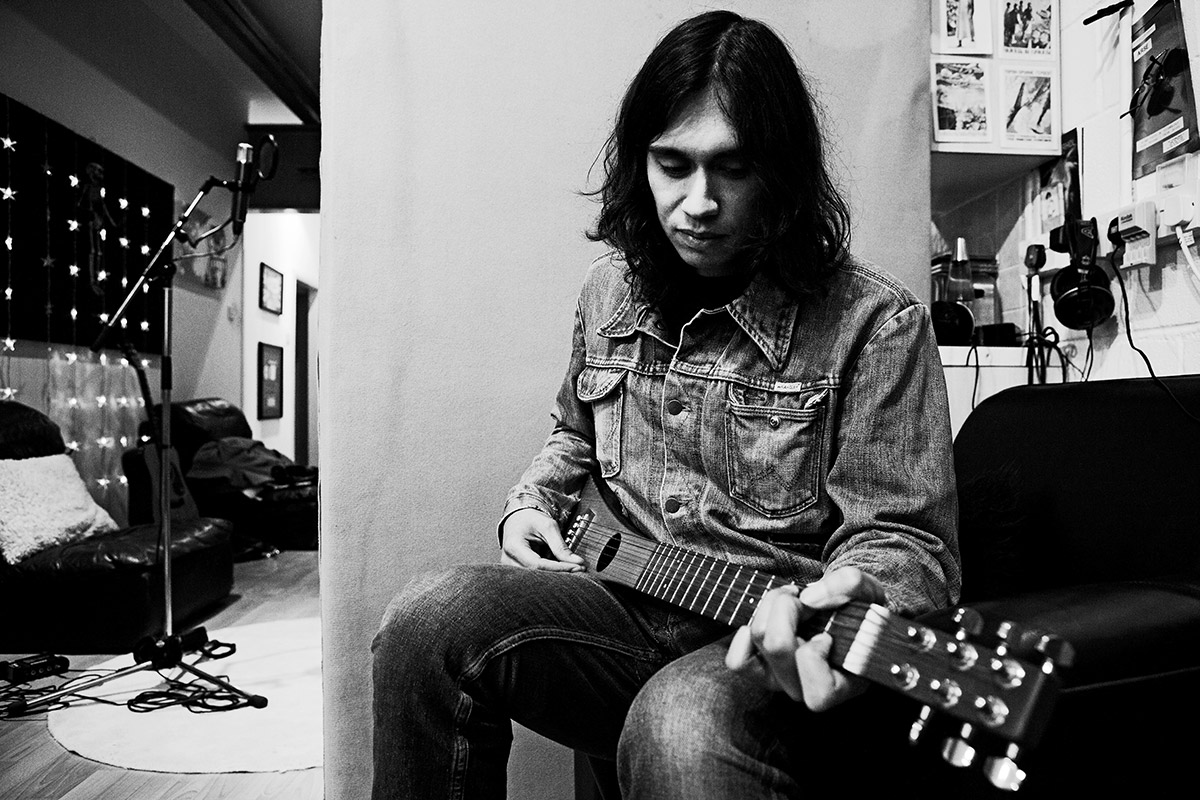
Observational because of the fact that I followed a musician for a day. My aim
was to portray and explore the idea of a day in the life of a musician, I asked
my primary to go about his day as if it was a normal day and as if I were not
there. I wanted to capture a sense of realism for the viewer, however it could
be argued that the fact there was a camera present effects the way my subject
would act. They would always be aware of the camera and may not act in a 100%
realistic way.
When taking my images I
made sure to select RAW on the 550DSLR to ensure that they were the highest
quality possible as well as to gain experience in shooting images in this
quality. What I found was that the images took up a lot of the SD Card space because
of the large data - RAW images saving as well as a the JPEG versions.
While shooting my
technical images, which had to practice techniques such as the Rule of Thirds,
breaking edges, change of ISO, difference of DOF, Differing shutter speeds to
capture movement in different ways. I found that I learnt more by actually
doing rather than just reading about these technical examples. When changing
the shutter speed for example, with a moving ball I managed to create a freeze
frame almost stopping time of the ball in mid air as well as the ball moving
fast. Both of these create a different look to the image, which conveys how
important shutter speed is in the final product of an image.
I tried to use as many of
these techniques that I could with my photo essay as well as trying to capture
decisive moment images, trying not to think too much about the image. I really
enjoyed playing around with background versus foreground with the images,
adjusting the focal length of the camera effects where a viewer will focus on,
making that area more prominent.
After I had taken all of my images I then had to choose which images I thought would tell the best story as well as look aesthetically pleasing to the viewer. Using Photoshop to edit the levels, contrast and vibrancy of my images I tried to enhance them in a subtle way, I do not agree with over-editing images. While editing my images I had to ensure that I added my copyright notice to all of my images, to protect them from being used by others and making sure that I owned the rights to them.
By Zara Kirkpatrick
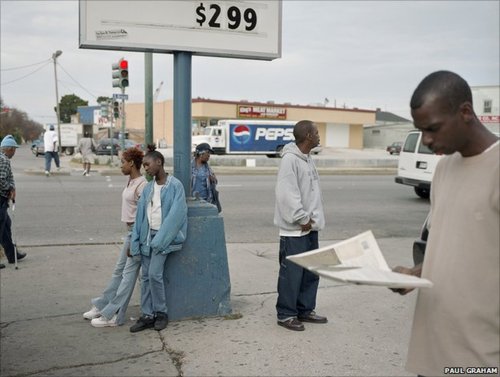
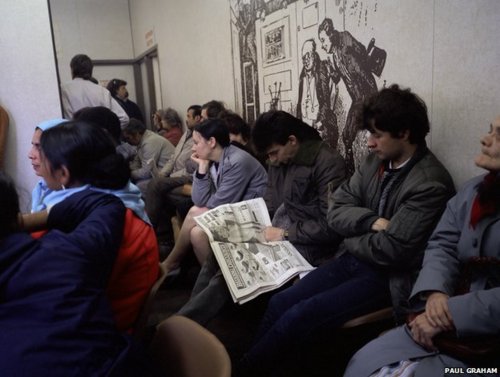
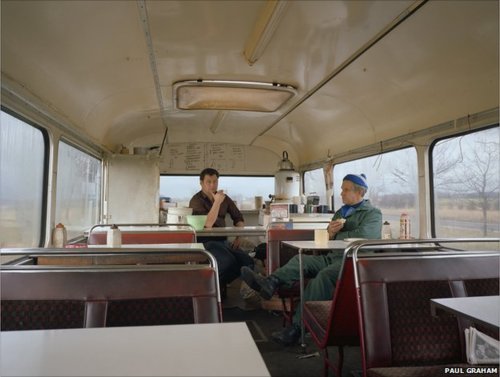
The photographer’s I was inspired by during this project were Paul Graham, with his observational way of taking photographs. His images are beautifully simple as well as creating many different meanings for the viewer. I like his use of everyday situations and how he makes them look interesting and different, I hope with more experience I can create a similar aesthetic to my images. | These are some examples of Paul Graham photographs that I was inspired by. <<< Another photographer that I was inspired by was Michael Williams, who photographs musicians, which I found very useful when shooting my musician. His images capture Henri-Cartier Bresson’s Decisive moment theory, which I am inspired by and enjoy trying to create the natural look in my photography. Another genre that I enjoy is Voyeurism, which are images of everyday things that can seem secretive or like the photographer is investigating something. By Zara Kirkpatrick |
To show my awareness of documentary practice, I’ll be reviewing my
own ideas and documentary work. For my photo essay I wanted to use the
photojournalism approach of putting across the pure and simplistic beauty of Newquay
and its surroundings.
During week three and four the settings, styles and adjustments of the new 550D/650D camera’s we’ll be working with over the course of semester one were explained. These not only helped me for documentary purposes but most importantly for my photo essay. In my photo essay we had to demonstrate the uses with the new Canon’s via photo essay and technical photos. The first task was to produce examples differing the depth of field, shutter speeds, focus through shot, breaking the edges, panning, night flash, long exposures, film speeds, white balance and finally above and below shots to demonstrate our experience. When creating my depth of field pictures I was inspired by Andrew Farrington, as you can see by the two examples below Andrew likes to use a variety of depth of fields depending on what effect of feeling he is trying to create with the photographs.
The photograph on the right is an example of how the use of a narrow depth of field used by Andrew to pinpoint the subject centred in the middle and blur out the busy background. The image on the left is an example of how he uses a large depth of field to capture the whole shot in focus, he has purposely used a large depth of field here to enhance the leading lines created by the trees and the reflection in the water in the photo which is used to lead the viewers eyes to the subject centred in the middle of the picture just like his other photograph. Allthough both purposes of the photos are to draw our eye to the middle of the photo Andrew uses a narrow depth of field to blur the background in one them because of the busy background potentially taking attention away from the man in the foreground whereas with the other photo the background isn’t busy at all with means there isn’t a lot of necessity in using a narrow depth of filed for it.
Photos by ANDREW
 |  |
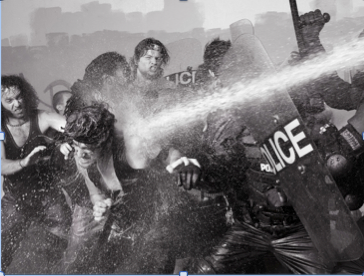
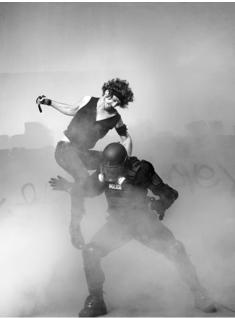
With shutter speed a good example of a photographer who’s capturing images using all kinds of shutter speeds is Zach Gold and Bert Hardy. Both these photographers experiment with the shutter speed when capturing their images. Zach Gold was one of the first artists in the world to successfully blend the subtle complexities of both camera and computer to produce photorealistic digital art. The photos by Zach which I have placed below show two example of how he experiments with different shutter speeds depending on the look or style he wants to create in a photo. The photo on the left show how Zach has used a slow shutter speed purposely to capture the movement of the water, whereas in the image on the right he has used a fast shutter speed to enable him to capture the movement of both subjects fighting without capturing movement just a crisp and clear shot of the subjects in action.
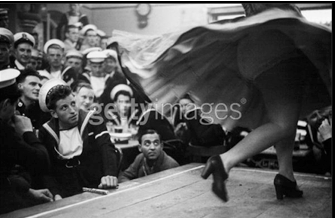
In the images by Bert I have placed below show how he uses two different types of shutter speed, the image on the left shows a use of a low shutter speed which he has used to capture the movement of the womans’ skirt whist she is dancing on stage. The other photo on the right shows the opposite, Bert has used a fast shutter speed whilst the two boys in the photo run past him. The fats movement of them running would mean Bert would have to set the camera to a fast shutter speed for him to get a clear photos of these boys whilst running, if he was to capture the same photo in a slow shutter speed the boys legs and arms would be blurry from the movement they are making.
Photos by Zach Gold
 |  |
Photos by BERT
 |  |
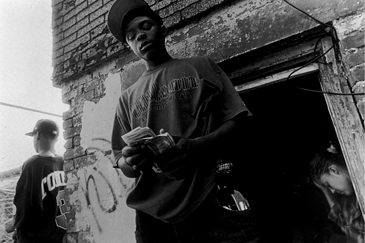
A good example of someone who uses the technique of breaking the edge and above & Below is Brenda Ann Kenneally and Lauren Greenfield, both these artists us. Brenda is a documentary style photojournalist whose long-term projects are intimate portraits of social issues. She is working to push the boundaries of the social document, using the web as a tool to expand and contextualize her immersion style of reporting. Lauren Greenfield is also a documentary style photojournalist, both her and Brenda concentrate on social issues but unlike Brenda who deals with issues like poverty and drug culture, Laurens photography generally deals with issues relating to youth cultures, gender, identity, body, eating disorders and the influence of media and popular culture.
What I like about both there photojournalists is how the capture these issues in society with unique and interesting photographic techniques. The examples below show how they use the techniques of above & below shots and breaking the edge. Photos like this enhance the Observational theme, techniques like these are commonly used to created the voyeuristic feeling to photos. This technique also makes the audience see beyond the edge of the frame, stimulating the imagination; to what cannot be seen.
 Photos by LAUREN 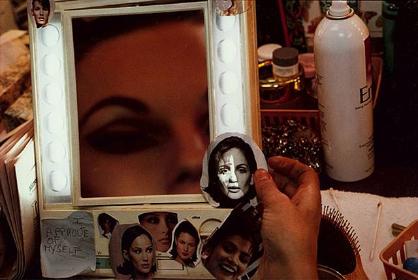 | 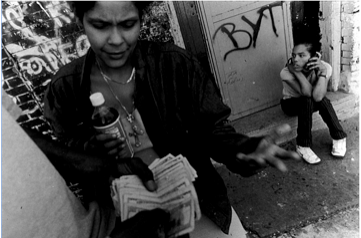 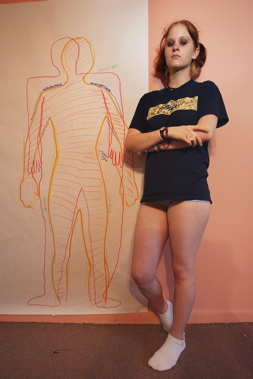 |
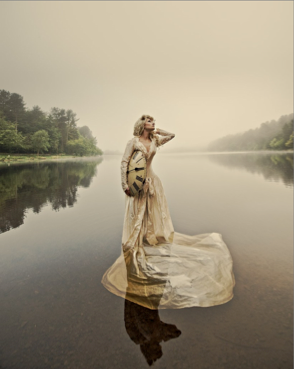
With raw editing I was inspired by images from Eleanor Hardwick, the simplistic changes she makes to her photographs are beautiful. They may be simple changes but these changes can make a big impact to the photo, for example some of her photos below have simply been changed into B&W and the curve/levels change to add more intensity to the photograph. She also played around with filters in raw editing to manipulate the colour of the photos, just like the one bellow where she has added a blue filter to the images create add a cold look to the photo and also creating the feeling of sadness and loneliness.
One of the most important aspects of creating a documentary is showing the journey of whatever/whoever the subject is through decisive moment. This could be through the filmmaker or the documentary itself. This can be seen in many examples of not just the fact that the documentary contains a journey but why they want to make that journey in the first place.
By Monica Gameiro
My original photo essay idea unfortunately fell through due to sickness so Canal Life was a bit of a ‘last minute’ idea.
I decided to do it in the style of mostly decisive moments pioneered Henri Cartier-Bresson, Robert Franc and Garry Winogrand who is quoted as saying “When I am photographing I see life, that’s what I deal with. I don’t have pictures in my head. I don’t worry about how the picture is going to look. I let that take care of itself. It’s not about making a nice picture. That anyone can do.
I also wanted to use the observational mode developed in the 1960’s. I felt it would be more natural with the subjects not looking directly at the camera, although I did feel it necessary to use some staging, where I integrated with both canal visitors and café and barge owners.
Philip-Lorca di Corcia and Cindy Sherman are considered pioneers in staged photograph
What was conceived when I first considered the idea was to create a mimesis and verisimilar world to portray some of the things that occurs on and beside the canal.
Candid photography simply captures people living an event. In candid photography of people and animals are frequently taken without the subject's awareness. Sometimes the subject is aware that the photograph is being taken at some point but not when. I used these techniques in some of my photo essay pictures. Arthur Felig was a renowned photographer who used this type of photography; he documented life in the streets and captured life and death at their rawest in New York. Many argue that candid photography is the purest form of photojournalism.
I had planned to use the reportage style of photography in my original photo essay idea which is a style of photography that captures an event in a documentary style rather than a series of staged photographs in order to document an event as it really happened. The main traits of reportage are objectivity and narrative. Images have meaning and sometimes the images are black and white but not exclusively. However, we have a good opportunity to use this style during the group’s chosen 'The Showmen' documentary.
Robert Doisneau, William Eugene Smith, Garry Winogrand and William Eggleston are other renowned names in reportage.
As the famous quote by Henri Cartier-Bresson(considered by many to be the Father of photojournalism and the master of candid photography and life reportage) "To me photography is the simultaneous recognition in a fraction of a second, of the significance of an event as well as precise organisation of forms which give the event proper expression".
This quote echoed what I felt when I took the shot of Barry feeding a swan in my photo essay – I took the photograph just a right the moment also capturing a duck landing in the canal.
Walking along canal quay I saw a good decisive moment photo opportunity of a barge with it’s chimney smoking and in the background a resident of another barge adjusting his TV aerial. I zoomed in to get a close-up of primarily the smoke but I think I would have captured a better image if I used a slower shutter speed then I would have got a better view of the smoke. I’m still quite pleased with the photograph however.
I took a medium shot of the quay with some moored barges including the one I was luckily enough to get a trip on. At this point it started to pour with rain and I set the camera to landscape mode and tried to capture the raindrops hitting the water as well as the view of the barges in proximity of the buildings to show that part of the canal was pretty crowded. Unfortunately the end result didn’t show the raindrops, if I used a longer shutter speed I would have captured the rain falling.
I took a long shot which was a staged photograph that shows the barge workers chatting. I wanted to get an image of the cars passing above the bridge and in the foreground you can just about see another barge passing. The depth of field shows the cars out of focus and the back of the barge is slightly out of focus also, which is how I planned it. I decreased the depth of field and used a medium aperture to blur the busy background.
Also during my photo essay I found a great decisive moment which came up when we were approaching a bridge. I chose this image because of the juxtor position of the serenest of the canal and the contrast of the people rushing about in the heavy rain on the bridge above in the town.
I decided to capture a perfectly silhouetted figure (Barry) against a blurry background. I chose this image because of the juxtor positioning of the out of focus barges and the in-focus of Barry staring across the canal, not able to see his face, with his hood up it kind of portrays the sometimes sinister character of the canal at night. The darkness of the canal, caused by the surrounding trees added to the sinisterism. Many photographers use the technique of photographing people, objects or landscape elements against the light, to achieve an image in silhouette. The light might be natural, such as a sunset or an open doorway, a technique known as contre-jour or it might be contrived in a studio. Silhouetting occurs when there is a lighting ratio of 16:1 or greater.
I experimented in various photojournalism techniques during both my photo essay and my technical essay including, depth of field, shuttering speeds, foreground vs background using the hyper and meta aesthetics of photojournalism images. I used differing ISO speeds, apertures.
I also used relative context shots in my photo essay and also my technical photo exercise capturing visuals and icons, an example being famous ruins and canal jib.
I also experimented with Raw and put my own touches on the photographs. Raw is a record of the data captured by the sensor. If photographs are taken in Raw there will always be improving converters that come on the market both in the near future and years to come so these images can be improved even more dramatically in 10 years time.
I experimented a lot but I feel the mistakes I made in a way are good points as this highlight the need for practice and ultimately perfection.
Although I was quite pleased with the outcome of my photos I do recognise that some of them were out of focus and slightly blurred – this obviously will be a learning curve for me. I know that although I managed to get on the barges I could have used this opportunity more effectively by creating more dynamic shots – again this is a learning curve.
By Patrick Reilly.
The first things that I looked through and reviewed were the guides for the Canon DSLR 550D cameras. Before shooting my photo essay, learning about the technical side of how to create the techniques that I wanted was vital so in week three, there were specific PDFs and guides on how to use the camera. I made sure that it was set on fully manual when shooting for my photo essay. These guides were very extensive so I focused mainly on the manual mode and all the different things that the camera could do. Things such as changing the ISO which controls exposure, aperture which controls the depth of field (also manipulates light) and shutter speed (also manipulates light). I also explored different techniques of photography such as above and below shots, breaking the edge which are things that can be seen in my Technical Photographic Exercise page.
When it came to what mode my photo essay would be shot in, I researched into the PDFs specified on week one where it goes into depth of documentary modes. There were many modes that interested me such as expository mode, observational mode and participatory mode but I had to try and link these in terms of photography, not documentary. Out of these three, observational mode was the one that I thought best suited to my idea which was to follow the case study of a day in the life of a teacher. I did not want to interact with him at any moment, just to literally follow him in his normal working day and take decisive moment shots. This meant that I did not plan where exactly to take my photos but just took them when I could.
In week 5, there was also guides to editing the images in RAW. When I was shooting, I made sure that I shot in RAW plus JPEG just like the guide told me to do for 550D training. I then went through the guides of how to edit RAW photos which was completely different to editing photos in photoshop. There were many techniques and edits that I could do to create a number of different effects to help create a story. I thought that my photos did not really need much tweaking and just put the contrast and saturation up to make sure the colours really were obvious to the viewer. There were some photos that had little bits of exposure so I used the graduated filter to help dim those specific parts of the photo. I did not agree with editing the photographs that much since I think the photograph speaks for itself and delivers the message it was meant to deliver.
When using the techniques, I tried as much as possible in my photo essay to really experiment and get a good variety of diverse shots. This really helped me in post-production stage as I could choose from another of different takes for the same photograph to see what suited my photo essay best. One of the shots where the teacher is in a presentation sat down, I am sat just behind him. I used the setting where I can choose where the camera will focus on the shot. The teacher was to the left of the framing so I moved the focus to that so the rest blurred out thanks to the shallow depth of field due to the low aperture F's.
When we went on location to shoot the documentary trailer, the same techniques were applied in all of our shots. We made sure that we had hyper and meta protection which would stop people from stealing our ideas. This was followed on from the brief in week three that specifically told us how to do this and why we should do it. In photoshop, I made sure that I added all the copyright information so that all my photos were protected from the copyright law.
By Dale Stewart.
When approaching my photo essay I started like everyone else with the DSLR training that taught me the basics in terms of shutter speed, aperture, the different styles you can use as well as the importance of focus and care of the camera. It was important to fully understand the technical aspects of the equipment before taking it out and using it to shoot my photo essay. There would be many factors that I would incorporate into my photo essay that was reliant on the dependency and the capability of the camera. This would include such techniques as the ISO which I would have to utilise to manipulate the light as well as the shutter speeds and aperture that would be essential to certain portrayals I wished to give the subjects in my shoot. Depth of field could be used to single out a certain figure or taking a broader look at a group. I had a look into the technical shots on my individual page: Technical Shots.
I initially struggled with an idea for my photo essay-I wanted
to find something interesting or unusual that it would be simple to take a
photo of and create context and emotion for. I couldn’t think of anything that
would be simple to do as it would mean finding something outlandishly strange.
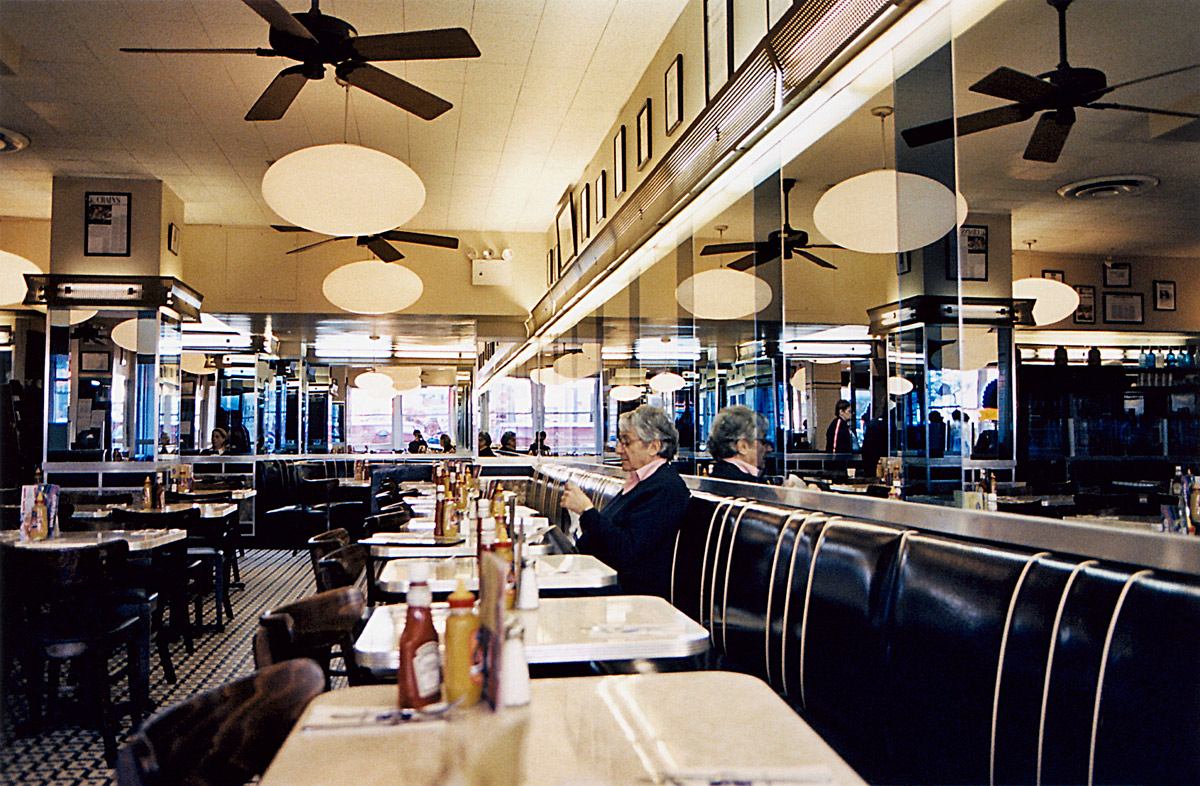
So I settled on the idea of shooting something simple and familiar, something
we all experience but never take notice of: Train Stations. I considered how
hundreds of thousands of people travel on public transport each of them barely
sharing a syllable to one and other. I thought it must be impossible that there
are no moments of social awkwardness or varying events that must take place in
these situations and how rarely you see something like this photographed.
The genre I wanted to mimic was that of Henri-Cartier Bresson and William Klein
who just picked up their cameras and went out onto the street and shot what
they saw. This is event driven photojournalism using decisive moment in an
Observational Mode trying to act like a fly on the wall, away from the action
and therefore not interfering with anything. The style these practitioners used
created a new view on the underbelly of society for Bresson this was of any
country he was in but for Klein it was specific for New York City, giving a new
view on a previously considered fully explored city. It’s this aspect of the
photography that has a certain Voyeur nature to it as it seems almost investigative
in its approach to what seems like a big taboo. I hoped to replicate this in my
take on photographing Train Stations, looking to find a hidden truth behind the
hustle and bustle of the average commuter.
I shot this piece in 650D which, I later discovered, does not support the RAW
editing software that we had been trained in before. So I had to use Photoshop
to edit my photographs which made things a bit more difficult which, as a
result, led me to making minor touches to add to and emphasise the message of
each photo. Rather than editing the photos all under one set idea and theme I
wanted to edit each independently, concentrating on each image separately and
editing them to suit the message of the photo rather than the photo essay.